I use flickr photos most of the time when I add posts to my blogs here or at Douglas Floyd. I make sure I post photos that have a Creative Commons license (either for personal use on my blog or commercial use for business stuff). You can easily search flickr via Cerative Commons by click on the flickr search box. Then clicking “Advanced Search. Then look near the bottom of the advanced search page check “Only search within Creative Commons-licensed content.” Then at the top of advanced search, add your search term beside the “Search for” box and find a photo that fits your post.
There are several advantages. One the posts look better. Two my top viewed posts all have photos. People online and offline are more likely to look at photos and read caption than read lots of text (even though I like to write lots of text). There are several ways to add flickr photos but here I am going to run through the simplicity of linking your flickr account to your blog.
1. Sign into your flickr account or create one.
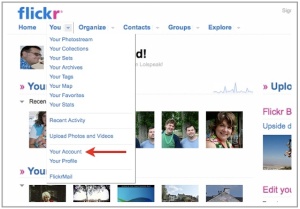
2. Click the small to the right of the “You” tab and select “Your Account.”
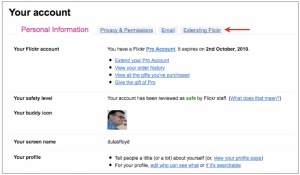
3. On the “Your Account” page, click the “Extending Flickr” tab.
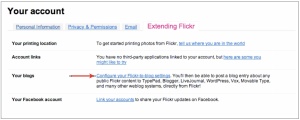
4. Under the “Your blogs” section, click “Configure your Flickr-to-blog settings.”
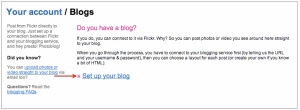
5. Choose “Set up your blog.”
6. Click the drop-down menu, and select the blogging platform you use. (If you don’t already have a blog, I recommend setting one up on WordPress. It’s fast, free and easy.
7. You’ll need to provide the following information from your blog: API Endpoint, username, password. WordPress API Endpoint is http://your.blog.address/xmlrpc.php (for an extensive livst of API endpoints see, http://ecto.kung-foo.tv/docs/pgs/tocEndPoints.html
8. Now when you see a photo on flickr you like, you can click, “Blog This,” then add your title and copy (with html if desired) and the post will automatically show up on your blog.
9. I always go back to “edit posts” and add tags and categories for the new blog post.
